Educator, Thinker, Consultant

Category: Moodle (Page 5 of 8)

Finding your work

Whenever we do work, we never know what or where it will impact people. I was reminded of this once again when I discovered that some work that I did for ATEP was featured on Moodle News. Since the title of the post is “Download This Course on Using Moodle”, I’m going to go ahead and presume that there is some support there (it is even referred to as a “quality walk through”).

This is a course that I developed specifically for the ATEP program (which was funded by a National Science Foundation Grant).

It’s these odd times when you realize that the work that you do can go beyond what you know. I know that I worked with some wonderful teachers who developed the material for the ATEP site. I know that positive feedback that I received when working directly with them. The lead investigators were very positive about my contributions. They provided some wonderful feedback.

But I thought that was pretty much the end. Once more, though, I’ve been presented with an opportunity to remember that you don’t always know how, why or with whom that you make a difference.

But sometimes, you are lucky enough to find out.

Moodle and Wiris

We have been using Wiris in our Moodle installation to help teachers and students deal with math and science equations. In a perfect world, everyone would use LaTeX (which is the standard for math notation in writing). (Actually, in a perfect world, math and science notation would be easily integrated into writing and page layout). However, LaTeX is complex and involves a fair bit of a learning curve. Most teachers aren’t going to learn the ins and outs of LaTeX, and certainly, students aren’t going to master LaTeX as they are learning math. Neither one of them should have to do so.

Enter Wiris. Wiris allows the user to use visual buttons and prompts to easily create math and science notations and equations. Wiris essentially adds a visual way to easily create math formulas. It looks like this:

*Note that Wiris uses LaTeX for the actual formatting.

We’ve created a variety of sample math problems for students to practice their math skills. These math problems are presented in a random order. Additionally, the students can check their answers immediately. The goal is not for summative evaluation; rather, the goal is for students to practice and hone their math skills. As part of checking their answer, the students get specific feedback on what is correct or not. The teachers used Wiris to provide some of that specific feedback. That turned into a problem. Some of the questions didn’t use the Wiris editor in the question, just in the feedback. That would cause some programming issues with Moodle.

So, we reached out the Wiris people. We provided feedback. The feedback included screenshots and detailed descriptions of the conditions where we were seeing problems. I’m happy to report the Wiris people have issued an update which fixes the issues that we saw.

Lesson learned? Reach out to the developers of tools that are useful. Provide them with specific, detailed descriptions of the issue. The good developers will be responsive. Who knows, you may even help solve a problem so that the next user never even knows that the problem used to exist. They will just find joy in a tool that works wonderfully well for them.

Studying

As a principal, I used to meet with students and parents regularly. Frequently, those meetings were held because a student wasn’t doing as well as was possible. The subject of studying would inevitably be discussed. Generally, the student would study by reading and then reading some more. While this may work for some students, much more is generally needed.

Research shows us that students need to do much more to study. There are some really nice posters that communicate this over at The Learning Scientists Poster page.

These posters specify six different strategies:

These are strategies that all students should know and have be able to use. Not all of these strategies will be used all of the time, but students should know them and know how to use them.

I’ve shared this with others. One of my wonderful Tech Coaches, did a write up on how he used Moodle while in the classroom to provide students with retrieval practice. He is an excellent teacher. His write up is titled “Practice is Best”. Do yourself a favor and go read it.

He discusses how Moodle can provide teachers with a wonderful way to help guide students and provide them retrieval practice.

My experiment produced extremely favorable results. Test averages jumped. Anxiety levels on the day of the test seemed to plunge. And the two probably had an effect on each other.

Sometimes, it is necessary to review what we do as teachers. It’s also important to look at how we do. Take a look at the studying strategies. Maybe you’ll want to invest a bit in yourself and learn how Moodle can help your students study more effectively.

  • Bonus hint: what if students created the quizzes (along with why an answer was wrong)?

Biology Materials

I’ve been fortunate to work with some really excellent educators. These fine teachers have developed materials that were piloted with students this last year. The materials are now being made available for free to any teacher who wants to use them.

The first materials available are the Biology modules. These are high quality biology resources that a teacher could use, or adapt for use, in their very own classroom. The materials are all being made available through a Moodle site.

ATEP (Articulated Technological Educational Pathways) Project was the result of a National Science Foundation Grant. The group put together resources for Biology, ICT (Information and Communication Technology), and MMT (Modeling and Manufacturing Technology).

(In case you are interested, my part of the project was to upgrade the “look and feel” of the Moodle site that ATEP was using. I also did some training on using Moodle. That training included developing resources to help instructors use Moodle as well as providing guidance on how to structure material within Moodle. However, the implementation presented for public use and consumption is decidedly “plain vanilla”. This was intentionally done to make sure that users didn’t need to have special themes or plug-ins installed).

Please head over to the ATEP site and check out the resources. All of the courses are available for download and installation into your very own Moodle instance.

Start with the Biology Course. Biology has two modules (A & B). Module A includes the following sections:

  • An Introduction
  • The Design Process
  • What is Biotechnology
  • Biology Review
  • Biomanufacturing: The Story of Insulin
  • The Effects of Insulin
  • Biomanufacturing
  • Protein Purification
  • Solving the Insulin Problem
  • Bioreactor Training
  • Product Redesign and Maximizing Product Production

There are exclusive teacher resources in each of the sections.

You can register for the site with an email. (This is done solely to provide a way to download the materials. Emails are not being collected for use in any other way).

There is a “Download Course” which has links to the files to download so that you can install the courses on your own Moodle site.)

Frayer Model

Well, the wonderful people that I work with have done it again. This time, they’ve rolled out the Frayer Model in Moodle. Once again, the Database activity forms the base for this work.  The students can then enter relevant information (Concept, Definition, Image, Example, and Non-Example) to create a Frayer model.

Here are the fields for the student to complete:

frayer-model

Students enter all of the required fields (those with a * ). Once they do, a Frayer Model will be created for them.

tech-training-patterson-frayer-model-2016-11-09-20-48-57

When the student places a mouse over one of the fields, the information is brought forward.

tech-training-patterson-frayer-model-2016-11-09-20-50-29


Since this is a Database activity, the work that students do can be shared with the entire class (or not). If you want all students to share, simply leave Approval set to “No” (in the Entries section). Conversely, if you want each student to only see their own work, set “Approval required” to “Yes” (and don’t approve anything).


Here is Mr. Chris Kenniburg explaining the process.

You can download an example from MoodleNet as well. Once you download the zip file (do not unzip), create a new Database activity. In the new Database activity, select the appropriate settings. The first screen will ask you to “Start building your activity”.

Click the “Use a preset” button. Then, on the “Action” button, select “Import preset”.

Drag your zip file that you downloaded into the box.

Click the “Import preset and apply” button.

Remember to review the Activity Settings to make sure all the tips above apply.

5 Ways for your students to say “Hi” in Moodle

Having your students introduce themselves can be a powerful and useful activities. Whether your class meets in person or just online, Moodle can help your students introduce themselves to you or to the entire class.

Teachers can use any to the modules below to find out more about their students. Which module you pick is dependent upon what you want and how you want to know that. Some questions to consider:

  1. Do you want all of the students to see the information?
  2. Do you want to guide students by having a form or do you want them to follow directions?
  3. Do you have a comfort level with using a specific module?

Glossary

This one is probably my favorite way for students to introduce themselves. Set up a Glossary, and then let the students add in information. Each student would enter their own name as the “term” and then whatever information that you want as the definition.

Important Notes:
  • Easy to set up
  • Easy for students to enter their information
  • Can be used with the Random Glossary Block to display a student name for other students in the “side bar”
  • No automatic grading (but can be graded)
  • All students can include pictures
  • Entries can be approved by the teacher before the other students can see them

Database

This allows the teacher to set up a “form” for the students to fill out. The database is viewable by all students.

Important Notes:
  • Allows for multiple types of information (such as checkboxes, pictures) to be collected.
  • Checkboxes means that specific information can be gathered. May be especially useful for lower grades.
  • Easy for students to enter their information
  • A bit more work for the teacher to set up
  • No automatic grading (but can be graded)
  • All students can include pictures
  • Entries can be approved by the teacher before the other students can see them

Forum

The Forum module allows the teacher to set up a forum in which each student would create a post. The post can have a variety of information in it. However, it is more limited than the Glossary or Database.

Important Notes:
  • Easy to set up
  • Each student can reply specifically to other students
  • Can be graded
  • Each student gets a separate line

Assignment

Many teachers are comfortable with the Assignment module. Unlike the Glossary and Database modules, the Assignment module will only be viewable by the teacher.

Important Notes:
  • Easy to set up
  • Limited to teacher viewing the information
  • Private between each student and the teacher

Quiz

Like the Assignment module above, the Quiz module would be limited to collection of information about students. Only the teacher will see all of the responses. The advantage of the Quiz module is that the teacher can create a template for the student to complete.

Important Notes:
  • Many teachers are comfortable with creating a Quiz
  • Limited to teacher viewing the information
  • Private between each student and the teacher

The Top 25 Tools…You won’t believe #4

Below you will find a list of the top 50 tools that you can use in your classroom. You won’t believe how incredibly powerful number 4 is. Number 4 can completely change your classroom.

25 Moodle
24 Moodle
23 Moodle
22 Moodle
21 Moodle
20 Moodle
19 Moodle
18 Moodle
17 Moodle
16 Moodle
15 Moodle
14 Moodle
13 Moodle
12 Moodle
11 Moodle
10 Moodle
9 Moodle
8 Moodle
7 Moodle
6 Moodle
5 Moodle
4 Moodle
3 Moodle
2 Moodle
1 Moodle


Now, if this was a real Buzzfeed article, you would’ve had to click through lots of pages to see each tool. But here’s the thing, instead of playing around with 25 different tools, learn one that will truly help your students. Moodle can do exactly that. Moodle can help allow for specific, timely feedback. Moodle can allow students to time shift their learning. Teachers can provide students with experiences that students can review and reuse.

I certainly understand the fascination with new tools. I’ve sat through my share of 60 tools in 60 minutes presentations. I’ve played around with lots of different tools. But, it really comes down to the classroom. It comes down to the students. The students don’t need new tools to play around with. They need tools and experiences that will help them learn and grow. Moodle will do exactly that.

So take some time to invest in yourself and your students. Learn some Moodle today.

Moodle FlashCard Update

DB Ideas: Moodle FlashCards 2016-04-28 21-00-59

Moodle FlashCards are wonderfully useful. In doing some additional work, it became clear that it is preferential for the FlashCards to open in “Single view” mode. Indeed, I received a request with that particular feature. Essentially, doing so means that the FlashCards would open with the view of a single FlashCard. FlashCards are built off the Database activity within Moodle. By default, Database activities open in the List view.

So, how to change the default behavior in the Database activity to present a FlashCard straight away? I turned to the forums and William Lu came up with a terrific answer. He suggested that we move the actual FlashCard activity to an unseen Topic. For example, if you are displaying ten topics, move the activity to Topic 11. Then open the FlashCard activity and click on “Single view”. Now copy the URL. Then, go back to the section where you want the students to see the FlashCards. Create a new resource of the URL type. Paste in the URL that you copied from the FlashCard single view. A perfectly wonderful work around.

I’m lucky enough to know some other really smart people too. One of the worked up a couple of adjustments to the Templates. There are two Templates that you need to adjust.

First of all, you need to create a class to call. Copy and paste the code below into the List view template:

Templates | List template (Click on Disable Editor button) | Repeated entry box paste this code (replacing what is currently in the box):

<table width=”100%” class=”fc-list-item”>

<tbody><tr class=””>

<td valign=”top” align=”left” width=”175px”>##delcheck## Question: <br>&nbsp; &nbsp; &nbsp; &nbsp; &nbsp; ##edit## ##more## ##delete## ##approve## ##disapprove##

</td>

<td valign=”top” align=”left”>[[Question]][[Picture]]</td>

</tr>

</tbody></table>

<br>

<hr>

(The real difference here is on line one with the addition of class=…)

Next, replace the Javascript template code with the code below:

document.addEventListener(“DOMContentLoaded”, function(e) {

var redirect = window.location.search.indexOf(‘redirect=false’) == -1;

var fc_list_items = xpath(‘//*[@class=”fc-list-item”]’);

if (fc_list_items.length != 0 && redirect) {

location.href = location.href + ‘&mode=single’;

}

var view_list_btn = xpath(‘//*[@title=”View list”]’);

if (view_list_btn.length != 0) {

view_list_btn[0].href = view_list_btn[0].href + ‘&redirect=false’;

}

var fc_btn_container = document.getElementsByClassName(‘button-container’)[0];

/ Add a random card button /

var fc_paging = xpath(‘(//*[@class=”paging”])[1]/a[not(contains(@class,”previous”) or contains(@class, “next”))]’);

if (fc_paging.length != 0) {

var fc_rand_btn = document.createElement(‘div’);

fc_rand_btn.setAttribute(‘class’, ‘btn-togglecard’);

var fc_rand_btn_h1 = document.createElement(‘h1’);

fc_rand_btn_h1.innerHTML = ‘Random Card’;

fc_btn_container.appendChild(fc_rand_btn);

fc_rand_btn.appendChild(fc_rand_btn_h1);

fc_rand_btn.addEventListener(‘click’, function(e) {

e.preventDefault();

var fc_rand = Math.floor((Math.random() * fc_paging.length));

location.href = fc_paging[fc_rand].href + ‘#region-main’;

return false;

});

}

/ Add a previous card button /

var fc_paging_prev = xpath(‘(//*[@class=”paging”]/a[@class=”previous”])[1]’);

if (fc_paging_prev.length != 0) {

var fc_prev_btn = document.createElement(‘div’);

fc_prev_btn.setAttribute(‘class’, ‘btn-togglecard’);

var fc_prev_btn_h1 = document.createElement(‘h1’);

fc_prev_btn_h1.innerHTML = ‘Previous Card’;

fc_btn_container.appendChild(fc_prev_btn);

fc_prev_btn.appendChild(fc_prev_btn_h1);

fc_prev_btn.addEventListener(‘click’, function(e) {

e.preventDefault();

location.href = fc_paging_prev[0].href + ‘#region-main’;

return false;

});

}

/ Add a next card button /

var fc_paging_next = xpath(‘(//*[@class=”paging”]/a[@class=”next”])[1]’);

if (fc_paging_next.length != 0) {

var fc_next_btn = document.createElement(‘div’);

fc_next_btn.setAttribute(‘class’, ‘btn-togglecard’);

var fc_next_btn_h1 = document.createElement(‘h1’);

fc_next_btn_h1.innerHTML = ‘Next Card’;

fc_btn_container.appendChild(fc_next_btn);

fc_next_btn.appendChild(fc_next_btn_h1);

fc_next_btn.addEventListener(‘click’, function(e) {

e.preventDefault();

location.href = fc_paging_next[0].href + ‘#region-main’;

return false;

});

}

});

var xpath = function(path){

var result = [];

var nodesSnapshot = document.evaluate(path, document, null, XPathResult.ORDERED_NODE_SNAPSHOT_TYPE, null );

for ( var i=0 ; i < nodesSnapshot.snapshotLength; i++ ){

result.push( nodesSnapshot.snapshotItem(i) );

}

return result;

}

That’s it. Those two changes will make is so that when you open the FlashCard activity (or, more importantly, when your students open the activity), a single FlashCard will be presented. *Please note that it is expected that the List view will briefly show before switching to the Single view.

Either method will produce the same result.

Note that the “hide the activity” and link the URL is a great trick to have in your back pocket. This trick could be used in other places and certainly with other Database activities. I love the Moodle community and their willingness to share.

If you are using the FlashCard activity, I’d love to hear from you.

The link below is a FlashCard zip file. Download and have fun.

flashcards-preset-20161110_0124

Creating a Teacher Resource Folder in Moodle

Sometimes, it is helpful to have a Teacher Resource Folder within Moodle. Generally, when I create a course that others will be using as well, I create a teacher resource folder for each topic. I don’t want the students to have access to this folder, so I remove their ability to see it. Before I learned this little trick, I would use the Show/Hide function. However, that runs the risk of the teacher inadvertently showing the folder. That’s why I love using permissions to accomplish a Teacher Resource Folder.

This is actually very easy to do, once you know how. Let’s start by turning editing on. Then simply create a folder and title it “Teacher Resources”. I also add a description of “Teacher Resources are available only to a teacher or non-editing teacher in this course.“, and click Display description on course page to on.

Teacher Resource Folder

*I usually leave the folder empty at this point. This is because I generally will duplicate this folder once it is set up. Once the folders are done, I add the appropriate resources into each one.

*If you have completion tracking turned on, make sure that you turn it off for this folder.

I scroll to the bottom of the page and click “Save and return to course.

So far, I’ve added a folder, but it can still be seen by anyone in the course. So I choose to Edit Settings for that Folder. This will seemingly take you right back where you were, but there is one significant difference, now you will have a Folder Administration Block.

Premissions Magic

In the Folder Administration block, you will have Permissions. For our purposes, this is magic. Click on the Permissions link. This will open a window where you can adjust permissions. We are only going to change one.

Permissions in Folder

Find the last plus sign on the line “View folder content” (under the Prohibited Heading). Click the +sign. This will result in a new window. Here, click the drop down to select “Student”.

Permissions in Folder: Teacher Resources 2016-03-20 16-12-31

Click “Prohibit” and you are done. What you’ve just done is to prohibit anyone in the student role from viewing this (and only this) folder.

Next, I duplicate the folder by clicking on Edit and then selecting Duplicate. The duplicated folder keeps the same permissions. I simply drag this duplicated folder to the next topic. I repeat this until each Topic has a Teacher Resource Folder. Then, I just add the appropriate material to each folder safe in the knowledge that the students won’t see this material. Generally, I use this folder to provide teaching tips, thoughts and additional resources for teachers. Sometimes, the folder will include full blown lesson plans. Sometimes it includes background material that is useful for the teacher.

Naturally, you can use this tip for hiding any resources that you don’t want students to see. This is best for resources that you will never want students to see though.

Enjoy.

More on Moodle FlashCards

The Moodle FlashCard database preset file has been updated. There have been a couple of improvements/corrections. The preset now works with any theme. Additionally, the Random button and next/previous buttons work on sites without JQuery installed.

So, how does this work? It is simply a database activity. This makes it powerful and easy to learn. Oh, and if you are so inclined, highly customizable. Since it is a database preset, all you really have to do is drag and drop one file and you are set to go.

Remember, database activities are available to all students. When students complete an entry, the entire class can view that entry (approved by teacher if so desired). This makes it possible for students to contribute the knowledge to the class. (Of course, the teacher could create all the cards, but I really think that misses out on the power of student creation and learning.)

So, what does this look like for a teacher? Simply head over the Moodle Courses and Content page and download the Database Preset: FlashCards file. (You’ll need this in a few minutes, so just make sure that you know where you are saving it).

Use these instructions to quickly make FlashCards. Log into a Moodle course where you have editing rights.

  1. Click the green box to turn editing on.
  2. Click on Add activity or resource
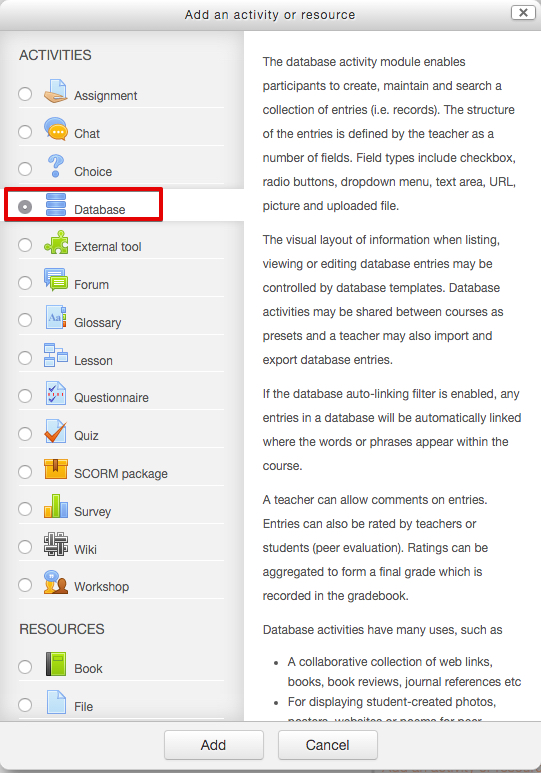
  3. Select Database from the list.
  4. Click on Add button.
  5. Enter a name for the activity. For our purposes, we used FlashCards.
  6. Enter a description. This is a good place to put directions. For our purposes, we used “Add interesting words that you find for the class”.
  7. Click Save and Display.

Now we’ll select the preset. You should see a couple of text boxes. One will say that “There are no fields defined for this database.” The other will say, “Please create some below or choose a predefined set to get started”. The choose a predefined set will be a hyperlink. Click that hyperlink.

On the next screen, you will have the option to Export or Import. Locate the file that you saved and drag and drop it in the box under Import for zip file (or use the Choose file button and navigate to the saved file that you downloaded a couple of minutes earlier). Then click the Import button. A new screen will load. Just click “Continue”.

You are now ready to go. Click “Add entries” in the box OR use the Add entry tab (do NOT click the “Continue” tab – it is pointless).

You will have four boxes available. Frontside of Flashcard has Picture or Question. Backside has the same options. (Note that there is also an “Alternative text” box under the picture section. This is used for ADA compliance as screen readers use that information). Something MUST be entered into the “Answer” box (even a space will do).
*Note that there is currently a bug in the database activity for Moodle which prevents the “Save and add another” from actually working. This will need to be to fixed in Moodle with an update. This is not specific to this activity, but to all database activities in Moodle.

That’s it. Now turn your students loose and let them create FlashCards.

Alright. Maybe you want a little more control. Maybe you want to approve the FlashCards before the other students can see them. If that is the case, look to the Administration block. Click on Database activity administration to reveal all the options, then click on Edit settings. Now click on Entries to show those options. Under Approval required select “Yes”. Scroll to the bottom and click “Save” (either one will do)

There are even more options. If you’d like to know more, contact me.

« Older posts Newer posts »

© 2025 Troy Patterson

Theme by Anders NorenUp ↑